I got this coffee machine from work because it was a maintenance nightmare. I'll tear it down, do the analysis on how it works and detail on some design problems as well.
It's going to be a rather long post with quite a lot of pictures. I've marked all the detected problems with an asterisk "*", I'm sure some have been forgotten as this teardown was performed 6 months ago.
(For troubleshooting see http://hackcorrelation.blogspot.de/2017/02/automated-coffee-machine.html)
General description
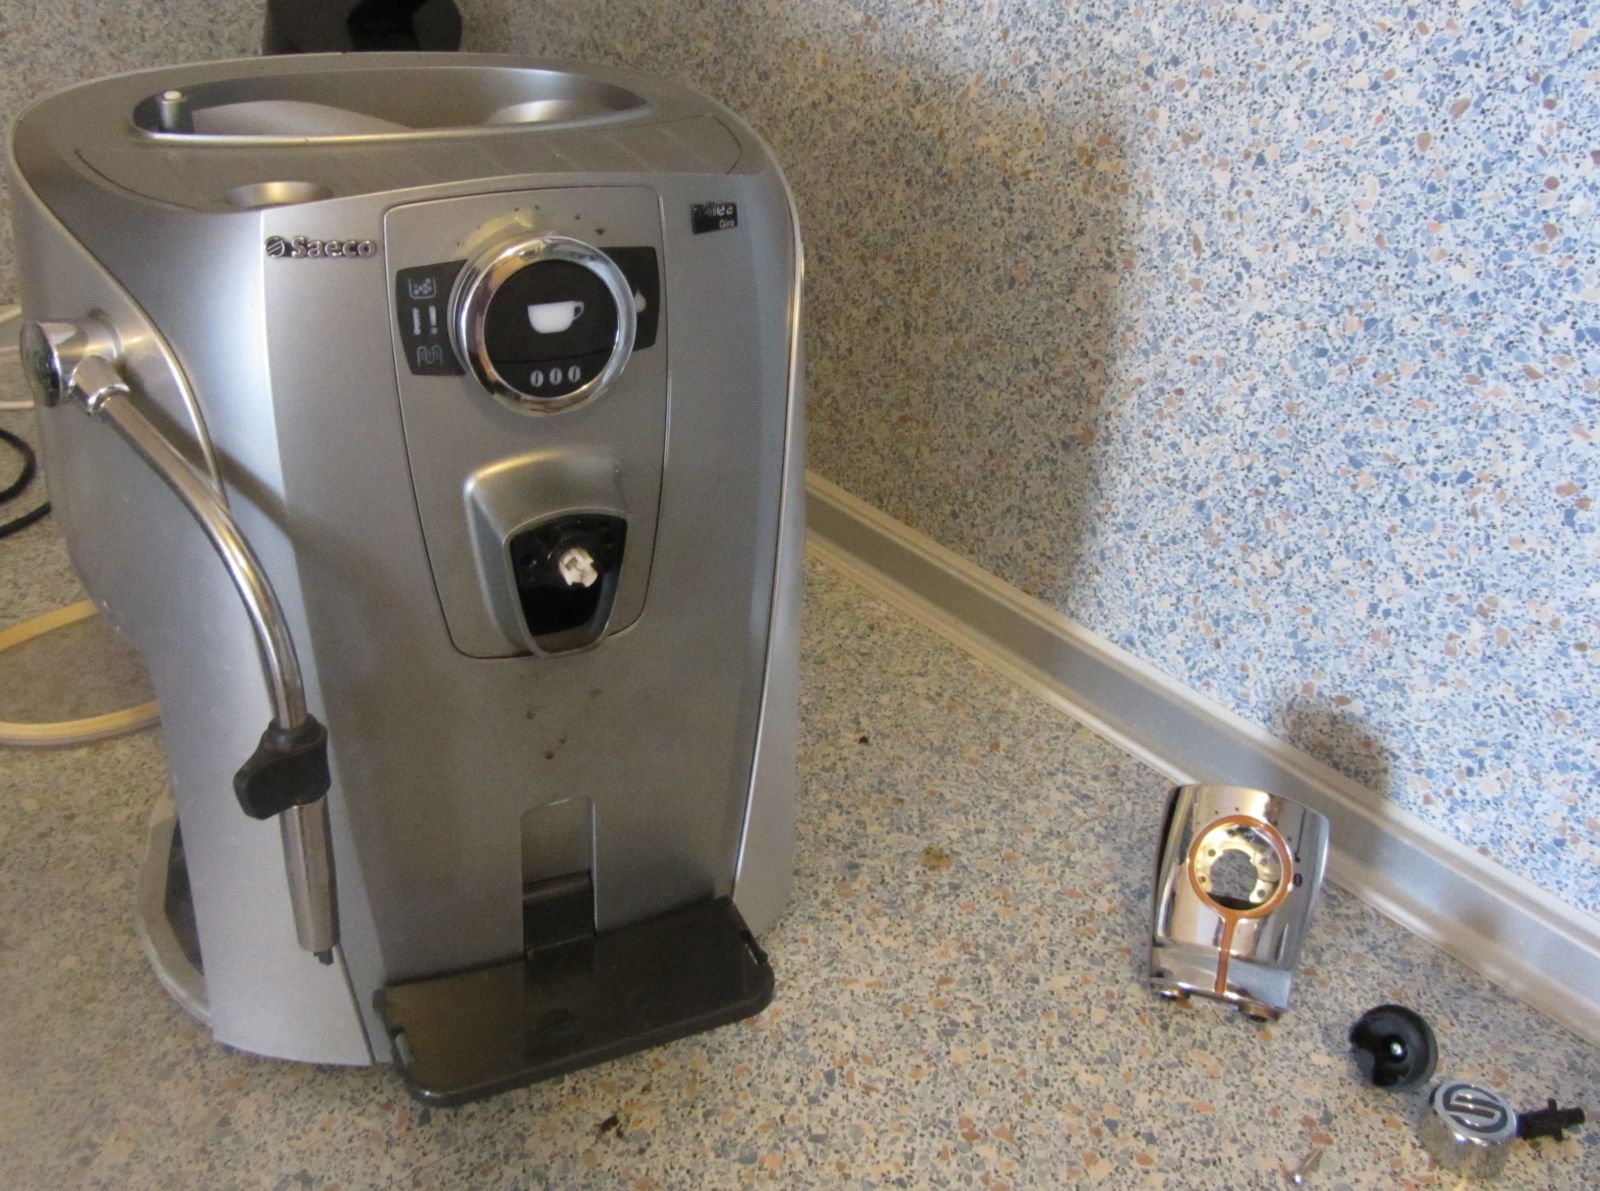
Initial view with some components off: the left side holds the water tank, the right side has the dregs (spent coffee) drawer and waste water reservoir.
Control panel: top left is the dregs full warning light, general warning light, descale light, coffee button, coffee quantity button, water quantity dial (ring), steam/hot water selector button (left).
The 'aroma' rotary button and coffee dispenser is disassembled and shown at lower right. Overfill drawer (drip tray / coffee cup holder) is off from the height adjustment assembly.
The pipe thing at the left is the steam outlet for milk frothing. If the droplet button (water selector) is pressed then it dispenses hot water for tea.
The top side held the beans reservoir.
From the top we can see the grinding inlet (yellowish), ground coffee outlet (round keyed hole, center right), steam selector valve (lower left), power supply heatsink (center), power button connections (lower right), infrared transceiver (bottom) and the gears from the water quantity adjustment.

Power board
The power board is responsible for supplying the control board with power and switching the heavy loads: grinder motor, boiler, water pump, flow-rate meter.
Some optocouplers at the bottom of the board and the small size of the transformer hint to a switch-mode power supply design.

*I've modified the steam selector valve (top picture, right; bottom left picture) a while back to block its output since it was leaking. I did fit new gaskets since the old ones were too worn out. New gaskets did not fix the problem so the faucet assembly (under the silver rotary button) was blocked with some screws and threadlock.
.jpg)
.jpg)
*The green gaskets are special high-temperature silicone ones. You can see the left one has shrunk and been eaten away by hot steam during its life. If this wear is significant enough, any higher water pressure caused by finely ground coffee or scale deposits will force hot water past the faucet and down the frothing tube.
If the pressure and wear are high enough no actual water will make it into the coffee, it will all be sent down the tube.
The power board has two connections to the signal/control board on the left.

Whenever taking apart stuff it is useful to document it, for both reverse-engineering purposes and putting it back together. So I made an excel sheet having all the connections from all the boards, pin numbers and connector code:
| Power Board | ||
| 5p | JP2 | ->JP4 signal board |
| 8p | JP5 | ->JP8 signal board |
| 2p | JP7 | grinder motor |
| 2p | JP8 | intake pump motor |
| 3p | JP1 | N/C |
| 2+1p | JP4 | power switch |
| 2+1+1p | JP6 | boiler power + flow meter |
ASSY
From now on I will refer to the rotary assembly that takes the coffee from the grinder, to the water valve and to the waste drawer as ASSY. The manual refers to as 'brew group'. It is not pictured here but a quick search on Google for "Saeco Talea Giro Brew Group" will display it:
http://www.coffeemaker-spareparts.com/Saeco-Spareparts/Primea-Talea-Odea-Parts/Brew-group-for-Saeco-Talea-Odea-Primea::3896.html

The assy is operated by a motor and has the following positions and operations:
- N - low limit - lets the user take out the unit, no parts are engaged, coffee holder is in place
- rotate R
- H - high limit - coffee is compressed into the water port, lower outlet valve is connected to the dispenser
- rotate L
- I - intermediary position - the coffee holder bottom raises up causing the spent coffee to fall into the dregs drawer
- rotate L
- N - some of the waste water falls into the bottom of the assy and down the inclined plane into the waste water reservoir.
*The next pic shows how much dirt accumulates during one month of very light usage. *Not all the ground coffee pouring from the top reaches the assy.
*Also, during rotation, some coffee is dropped because of poor tolerances.
*Steam coming from the waste tank under the assembly condenses and causes the spillage to bind (stick) and trigger the waste water sensor. *The inclined plane gets fouled with waste coffee and the assy gets stuck as well not being able to shed all remains.

*The waste water reservoir is also not properly aligned with the inclined plane and some water makes it onto the bottom of the unit and then under it.
Inside the assy drive mechanism we can see:
- assy detection switch, upper right
- high (H) and low (N) limit switches, center
- drive motor, simple brushed type, with a worm gear
- reduction gears (gray)
- waste water sensor (second picture)


I will detail the water sensor principle of operation later on.
Water circuit
The vibration water pump, situated at the back of the unit, draws water from the reservoir and pushes it through various hoses. There's a small flow-meter at the bottom that is used to measure water rate as well as detect lack of water.
The horizontal white cylinder is the relay for the boiler. Since the boiler draws a lot of amps it cannot be driven by the power board directly.
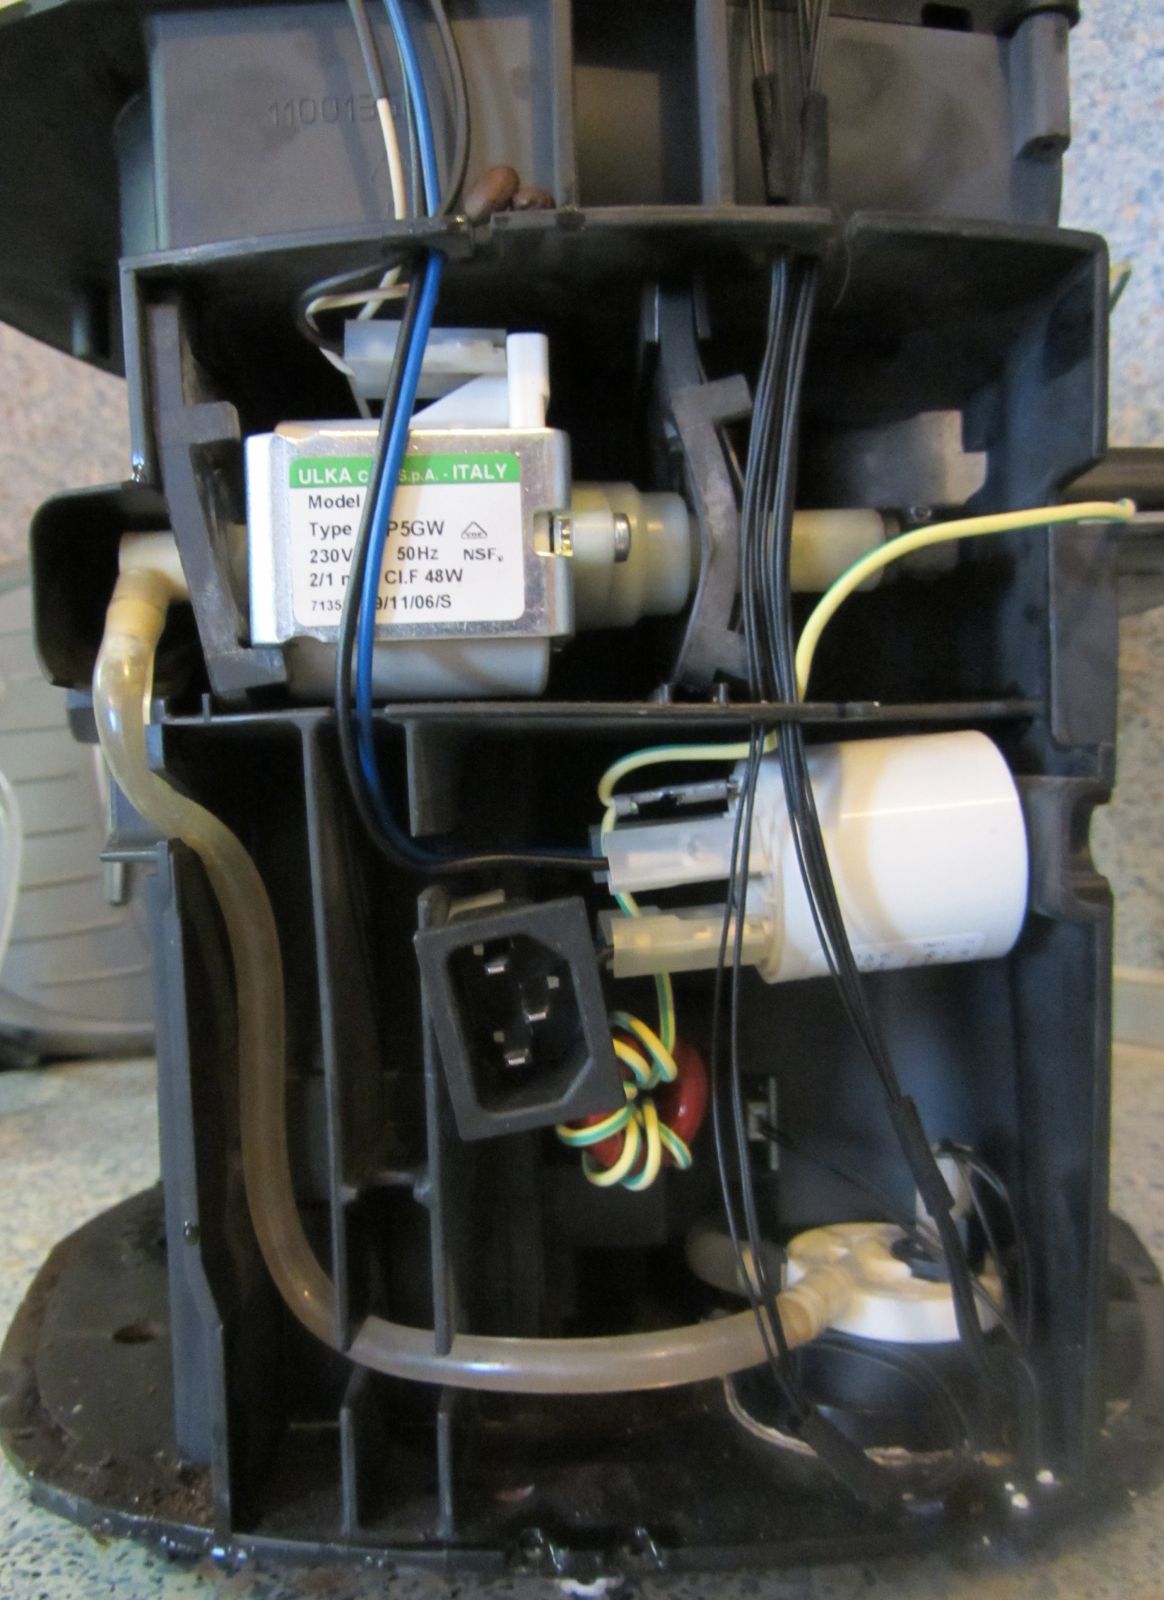
The boiler is at the left side of the unit, just above the water tank. *Some wires are being run unnecessarily close to this heated part, though it might have been an oversight of the technicians that last serviced it.

*Above we run into another problem: the small black pipe at the center pushes the water tank valve before the tank is properly secured to the unit. This means that if the tank is not pushed all the way in water starts to slowly leak out of the tank and below the unit, making it a safety hazard and ruining everything under it.
At my workplace, this "feature" completely destroyed the table underneath it within one year. The only way to safeguard against this is to give the water tank a punch inwards once-in-a-while and preferably immediately after refilling the water.
*Also, jolts from the other side (emptying the dregs drawer) might cause the tank to slowly come out of place with the same watery result.
I initially assumed that there is a high-pressure pump that pushes water at high psi once the water is hot enough but it seems that steam is build up from the boiler room itself and a blowdown valve keeps it pressurized.
*Since the blowdown valve is downstream of the steam faucet a slight seal failure will cause the pressure to escape via the faucet and the (unobstructed) frothing tube or the milk island output, whichever has more wear.
Control board
This is the most complicated part of the unit requiring quite an extensive write-up.
Top left, under the two resistor arrays, we have VN770K, a short-circuit protected H-bridge drive for the grinder motor. The high power resistor underneath it is connected to the "SOURCE 4" terminal which probably goes to ground.
The U12 chip is an NDS9948 P-channel MOSFET, capable of driving 60V/2.3A.
The black potentiometer is actually connected to the water quantity ring/dial assembly, so it's probably sampled through the microchip's ADC. Below that there's a jellybean 78M05 and then a part marked "32C65". It has 4 pins and it's marked Y1 so I assume it's a ceramic/crystal oscillator, though I've never seen that marking before.

The chip under the revision sticker is MCP908AP32 - part of the 68HC08 family from Freescale, a Motorola 6800 compatible successor. Fun fact: the 6800 was one of the first processors to require only one voltage supply, back in 1974.
It does have 2kB of RAM and 32kB of flash, two 16bit CCP/PWM timers, two serial modules (one with IrDa), SPI, SMBus, 8ch/10bit ADC, 32 GPIO with 8 sink and 6 source (25mA) outputs.
Next to the CPU there's an ST95040 4K SPI EEPROM, probably used to store machine statistical runtime data like running hours, number of coffees, error count and other stuff. I suppose so because the service mentioned at one point that the machine lost its warranty because it was used in an office environment instead of a home.
It's marked BU7032 and has 8 pins:
- GND
- GND
- +5V
- GND
- GND
- TX? (goes to CPU)
- RX? (goes to a pulldown transistor and then CPU)
- +5V
I was not able to find any info on it.
The rest of the components from the control board are just passives or jellybean actives, with a notable 3-switch selector on the right.
The front of the board has the user interface stuff: buttons and leds, along with the slot for the water quantity potentiometer.

*A design aspect of this is that the board is really prone to flexing when buttons are being pushed. The middle part moves about 1mm when the coffee button (most used one) is pressed and this gap will get worse as the plastic retainers wear off.
*The capton tape was probably put on as an afterthought as it's really not a suitable way to guard the board against scratches caused by the springs.

Back view of the user panel assembly, showing the tension/return springs for the water/steam selector button.
Just for reference, the steam selector valve/faucet is driven by a magnet coupled to the rotary button that closes some reed/magnetic switches.

The control board has quite a mess of wires and connectors so it's always a good idea to mark and document them. It proved especially useful (aside from the pictures) when I put the unit back together 4 months after I've taken it apart.

Initially the plan was to design a new board for the unit that worked around some firmware flaws: not being to rinse and descale the machine properly, dumping ground coffee AFTER figuring out that not enough water is available, dumping coffee randomly, poor indication of available water level, no auto power-off, etc.
You can see that after the initial rough documentation of the needed inputs and outputs this proved to be a non-feasible goal as too much R&D was required on my side, far outweighing the cost of dumped coffee or a better unit.
| Pins | Label | Ground pins | +5V pins | Signal/other pins | Description | Digital in (hall/mech switches) | Cap sensors | Analog in | Digital Out | Analog Out | Unknown |
| 2 | JP10 | 1 | 0 | 1 | boiler temp sensor (NTC/PTC) | 1 | |||||
| 4 | JP1 | 1 | 1 | 2 | steam valve selector | 3 | |||||
| 5 | JP7 | 2 | 1 | 2 | bean cover (2p) + grinder motor sensor (3p) | 1 | 1 | ||||
| 4 | JP2 | 1 | 1 | 2 | serial comm? | 1 | 1 | ||||
| 10 | JP5 | 3 | 1 | 6 | motor limit switches (3x2p), assy misplaced switch (2p), assy motor output (2p) | 4 | 2 | ||||
| 6 | JP16 | 2 | 2 | 2 | intake pump sensor (3p) + intake water level sensor (3p) | 1 | 1 | ||||
| 5 | JP4 | 1 | 1 | 3 | power/main board connector | ||||||
| 8 | JP8 | 0 | 0 | 8 | main board connector | ||||||
| 4 | JP3 | - | - | - | N/C | ||||||
| 2 | JP21 | 0 | 0 | 2 | side cover (assy/dregs) open switch | 1 | |||||
| 6 | JP23 | - | - | - | N/C (1 gnd + 1 5v) | ||||||
| 3 | JP22 | 1 | 1 | 1 | waste water level sensor | 1 | |||||
| I/O | |||||||||||
| PB1 | 1 | coffee qty button | 1 | ||||||||
| PB4 | 1 | coffee start button | 1 | ||||||||
| PB3 | 1 | water/steam button | 1 | ||||||||
| DL9 | 1 | empty dregs LED | 1 | ||||||||
| DL1 | 1 | heater on/heating LED | 1 | ||||||||
| DL4 | 1 | warning LED | 1 | ||||||||
| DL5 | 1 | descale LED | 1 | ||||||||
| DL2 | 1 | coffee on LED | 1 | ||||||||
| DL6-8 | 3 | coffee qty LED | 3 | ||||||||
| DL3 | 1 | water on/steam off LED | 1 | ||||||||
| P1 | 1 | water qty potentiometer | 1 | ||||||||
| 59 | 42 | 14 | 1 | 3 | 10 | 0 | 3 |
A good idea when sketching up these things is to count which pins are connected to ground, which are connected to digital power. The remaining ones will show you how many GPIO pins you require. Then you have to analyze the signal pins and figure out which are analog, which are digital and which are something else, so you can choose the uC with the required number of ADC channels.
Almost all the safety switches are hall sensors, thus magnetic-based. This includes the side covers open detection, bean cover and dregs drawer detection. It's useful to have a handful of magnets around when testing the unit with covers removed.
Water sensor
 What I though initially to be capacitive sensors (for water sensing) are in fact a turnkey solution that outputs a digital level.
 They are TS100 TouchCell units, probably custom tuned for Philips/Saeco.
I think the two resistors along with the PCB capacitor on the other side forms some kind of configuration that oscillates only above a specific capacitance.
The 6-pin IC takes 5V, ground, a common pin between the resistors and the two [differential] RC inputs and outputs HIGH whenever the capacitance threshold is reached, within 150us.
This can be achieved with a 555 timer and a Schimtt trigger.
Consider the following article: http://www.digikey.com/us/en/techzone/sensors/resources/articles/liquid-level-sensing.html and the last schematic. If the output of that 555 is integrated through a capacitor and fed through an op-amp in a Schmitt trigger configuration then the required output will be seen.
Maybe a single opamp can do both integration and triggering. Maybe the entire design can be done with a single or dual opamp package in a relaxation oscillator setup. Who knows, it needs some experimentation.
*The only problem with this setup is that it is not able to tell how much water is present, making it impossible for the machine to estimate whether enough water is available in the tank for a coffee of the selected size.
*The same sensor is used also for waste water sensing where it is too sensible, especially when coffee residues are present.
Hopefully Philips did not pay a lot of money for these sensors because even though they simplify firmware development they are not really able to quantify levels of detection. My guess is that they just order a few tens of millions of these and use them everywhere they get the chance to, even in cheaper units which do not have a microprocessor controlling the stuff.
Grinder unit
The grinder has an interesting design starting with a clean isolation from the outside. You can see there is no coffee residue near the motor. Top is the rotating center shaft with the non-rotating adjustable gear. Upper right is the grinding outlet.

The small wheel in the center rotates the big adjustment wheel, changing the coarseness of the ground.

The adjustment actually varies the distance between the two ceramic grinders.

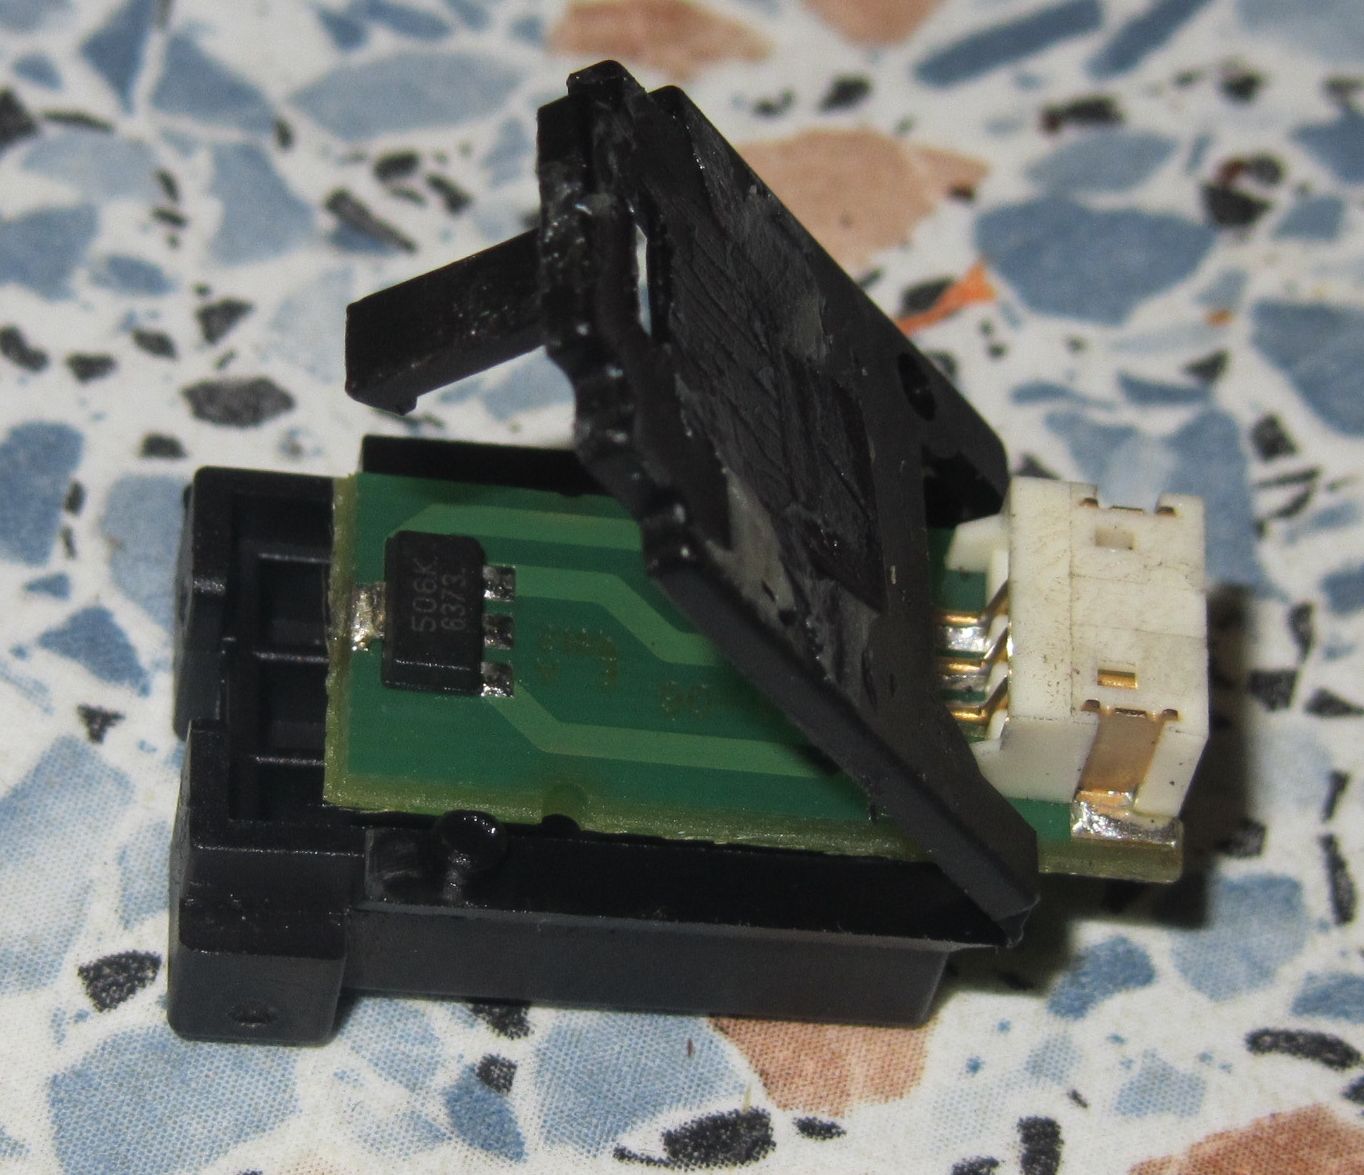
The lower wheel is driven by the brushed motor through a worm reduction. Notice the black rectangle with a connector on the lower side of the bottom cover. Also notice the two black magnets on the white gear.

The black box houses a 4-pin device marked 506K 6373. It's most likely a hall effect sensor and its output is sent to the CPU to determine the grinder rotational speed. From there, the CPU can determine if the grinder is stuck or out of coffee (spinning too fast).
Conclusion
There are a tons of things which I've forgotten since the time I opened up the unit. It was a good idea to take pictures at each step since without them the machine would probably still be in pieces.
What I assumed initially to a be a straightforward analysis of a simple machine yielded surprising findings. It is indeed not trivial to design a good automatic coffee machine, even less so to do one that gives good-tasting coffee like this does. I did assume however that many years of iterative design have gone into this and expected to find mostly only firmware mistakes. To my surprise, most of the problems with this machine and its slow death have been mechanical and hydraulic.
This article could have easily been five times longer and with ten times more pictures but everyone has a limited attention span. I might detail some inner workings and findings in separate posts.
Saeco Talea is a good automatic coffee machine but now I can't find it in Asian market, some latest Saeco coffee machine models like Intelia, Royal one touch... are more popular
ReplyDeleteVery interesting post, exactly what I was looking for. However, I got stuck at the first step: opening the machine... :(
ReplyDeleteRemove the screw under the coffee beans cover. Slide the cup drawer all the way down, pull it forward to remove it.
DeletePull aroma adjustment knob, there is a screw behind it, remove that as well. Pull out the aroma adjustment unit. See first picture (cup holder is not yet all the way down).
The coffee bean holder, front and top panel all come out as one piece. Some force might be required: pull the bottom part of the front panel over the cup holder and to the outside and work your way up to remove the top piece.
Undo all the torx screws (6-10) below the unit; there might be some screws also behind the doors, near the top.
Thanks for the post, trying to fix saeco syntia that is notoriously dumping the grinded coffee instead of brewing. Looks like there is problem with the load size detection and it overfills the brewing unit even when I select the lowest aroma setting :(
ReplyDeleteThe aroma setting on my machine does not affect the brewing process. Run the descaling procedure, adjust the coffee grinding to a coarser setting, clean the 'assy'.
DeletePieter: you need a torx (15?) screwdriver for most screws.
ReplyDeleteRemove beans cover, there is a screw under it.
Pull out the aroma knob, there is a screw inside it.
Move the tray to the lowest position and pull the outer part towards you. Now you can take out the big plastic middle part, by pulling it towards you, from above the tray, just enough to clear the water qty knob, and up.
Vaiovillage: does it sound like the machine is having a hard time getting water through the ground beans? It might mean that the grind is too fine, the coffee too greasy or the machine requires descaling.
ReplyDeleteIf it does not finish compressing the grind into a capsule and gives up then it might be that the big rotating assembly needs cleaning or that the o-ring around the piston might have come off and blocks the piston from going inside the cylinder.
I would look at these two first.
I'm on my third automatic coffee machine in the last 15 years. The first two were Miele with Saeco parts and the third is a Saeko Incanto Delux. Most of my problems have been with the water system. (Keeping the heaters clean, pumps working, and hoses not leaking.) Presently, my Incanto complains of a grinder block. I have cleaned the grinder and it turns freely with a wrench on the screw. Can I jump the two power terminals to test the motor? Do you know whether the grinder is powered by line voltage?
ReplyDeleteI don't remember off-hand but you can check if the motor has something
Deleteinscribed. Then I would test with 6V, 12V and if the motor doesn't draw any current then try with line voltage.
Gorgeous! I love your work.
ReplyDeleteBlock Board Manufacturer in India
i have the talea giro plus, it has worked for 2 years, but yes needs cleaned a lot to avoid problems. we have mostly had problems when we had friends over and i made too many americanos in a row. the steam build up would cause things to clog. Currently we are trying to fix a grinder problem. The machine works fine on bypass doser, but as soon at it sends a signal to grind coffee it stops and all lights flash red. Any thoughts? thanks, signed, coffee blues
ReplyDeleteWell, I would guess one of the following:
Delete- grinder set too fine, it can be adjusted from the top (barely) with an allen key
- grinder wheel is stuck, you have to take apart most of the machine to clean it
- grinder motor is at end of life and does not have enough power
- hall sensors are broken (unlikely) or the wires going to them have been pinched
I don't have the bypass doser (I think) so things might be different for you.
As a last resort try emptying the coffee beans and putting something softer, like rice, I've used this method before to clean the grinder but I don't think it's ok.
Two questions:
ReplyDelete1. Brewing cycle time on my Saeco Syntia is 15 sec. It should at least 25 sec. What could be done about it?
2. With a container full of beans machine does not finish the grinding and throws coffee out.What could be done to force the machine to finish the cycle?
1. You have to understand that these machines are not replacing the 5-50k espresso machines in the coffee shops, they are just a substitute.
DeleteNevertheless, the brewing time is either fixed (by timing) or dictated by the volume of water that has to pass. This means that with a finer coffee the water will have a harder time getting through.
2. I would guess that the machine thinks the grinder turns too fast or too slow. This can be caused by an incorrect coffee being used or an extreme grinding size (too coarse/fine).
Or perhaps the speed sensor on the grinding motor has failed.
I'm not a professional so please take my words above with a pinch of salt.
I got this coffee machine from work because it was a maintenance nightmare. ... ecoffeegrinder.blogspot.com
ReplyDeletegot a malfunctioning unit for free.. seems to make large cups but not small cups. Small cups setting it will grind, and go thru the motions but no coffee comes out. Maybe the large cup setting is also making less coffee. Water system problems?
ReplyDeleteThe water adjustment should not influence coffee making, it only sets the time(?) for the last step - how much time the water pump should be on.
DeleteIf you get very little water out then you need to run a descaling procedure: press the 'water droplet' button in the front and rotate the steam selector on top of the unit. Before that you should put some descaling agent inside the water tank (or at least a vinegar solution). Run it for 15-20s at a time, wait for 1 min, repeat. Do this for about 2 tanks until you hear that the pump is not forcing itself so much. Afterwards you need to run the same steps with clean water.
The number one killer for these machines is limescale so make sure to periodically descale (search wikipedia for 'Descaling agent').
If by large coffee you mean the 3-steps button on the front that sets the coffee quantity: grinding is too fine or 'ASSY' is too dirty.
I have the exact machine pictured but mine won't pour anything. I can't actually de scale either because nothing flows. The steam wand is working but not the coffee pourer. I took it apart and cleaned the hose fitting from the assy to the pourer and all the components of the pourer - everything seems to be clear but still nothing... any suggestions?
ReplyDeleteI found my problem. It was a blocked brew group. The little holes in the brew group got blocked so flushing the out with really hot water seemed to do the trick
ReplyDeleteI found my problem. It was a blocked brew group. The little holes in the brew group got blocked so flushing the out with really hot water seemed to do the trick
ReplyDeleteHi Chris, I'm glad you were able to solve the problem.
DeleteIf the brewing group got clogged then you wouldn't have been able to descale, so I assume the clog was before the brew group / assy.
For future readers, to force the machine to descale:
- fill the tank with distilled water and descaling agent as per instructions
- press the 'droplet' button on the front of the unit
- turn the hot water knob to the front position
The machine will make a grinding noise for a while. If this lasts for more than ~10s the machine will stop by itself but I suggest you stop after 5s.
At this point I turn the how water knob to the opposite position, releasing the pressure from the installation, wait a while, then repeat.
If machine refuses to anything after this point: check that there is water in the tank and that the waste water is emptied.
As a last resort, restart the machine via the power button and try the same operation.
In case of really hard water and/or unmaintained machine it might take 10 cycles to get the water flowing. Some vinegar might help, but at your own risk.
Also, there are refill kits with granulate and water filter (Intenza and Aqua Prima). The same granulate can be used to fill Brita-compatible water filter packs - a double win, since they are so expensive.
Good day i wonder if you can help me i got a coffer machine (seaco) and it is 110 volts can i change it to 220 volts. i blow the pc board that works with the power supply.
ReplyDeleteIt won't work, all the other components are rated for the supply voltage: water pump, boiler, supply for the main board and motors ...
DeleteYour best bet is using a 220->110V transformer rated for at least 1500W.
Can you please give a price on a power supply for 110 volts thanks
DeleteGreat review you wrote , congratulations .
ReplyDeleteI have a question: is it possible to reduce the rate of entry of water to create the best coffee ? Thank you, Emanuele
The easiest way to achieve that is to grind the coffee finer (smaller particles). The finer it is ground, the harder it is for the water to get through. At some point the machine will refuse to make a coffee, so just switch to a coarser setting.
DeleteThe Saeco has an adjustment for this - lift the lid for the beans and you will see a small adjustment screw. Press on it and THEN rotate it a small amount. Do not try to rotate it without pressing as it's locked.
Should be in the manual.
Hi! My saeco odea giro automatic coffee machine is dispensing the brewed coffee to the waste water reservoir instead of pouring from the nozzles in front of the machine and into the cup. Coffee seems to be brewed normal, only problem is that it gets into the wrong place. When cleaning cycle starts, when I start the machine, the water goes also to the waste not through the nozzles as usual. Any advice?
ReplyDeleteSounds like some pipes/tubes are clogged with scale deposits. Fill up half the tank with cleaning solution (or vinegar, worst case), run the cleaning cycle a few times while adjusting the knob for the frother in different positions. That is the knob for the cappuccino, above the machine. You can reuse the same water while it's hot, it seems to work better. Afterwards, do a normal cleaning cycle.
DeleteThere should be an accessory with the machine, it's like a small brush similar to the one used for cleaning bottles. I think it's supposed to go up the coffee dispenser holes to clean them up.
Check that the big assembly inside the machine is clean, the coffee filter (metal grill) is clean and that the tube from the side of the machine going to the coffee dispenser is free of obstructions. It's beneath the assembly, upper left corner.
Well i managed to solve the problem. It turned out that the thin tube in the upper left that brewing group inserts into (coffee dispensing tube) was broken and half of it was inside the brewing group part where it is inserted. I took it out using a toothpick (i inserted the toothpick deep then pull it out and the the part of the broken tube came out too) and then i used superglue to fix the tube. The machine works perfectly again. To replace the coffee dispensing tube you have to take apart the whole machine as i saw in a youtube tutorial about how to change it, so i am very pleased with fixing it with superglue that i think it will be ok if ill be careful at removal and reenter of the brewing group.
DeleteGlad you've managed to fix it. However, I don't think it's a lasting repair, the superglue will get washed away after a while (inside your coffee, nonetheless) and it will break again.
DeleteYou could try to reinforce it using a 2-part epoxy.
I am not convinced the entire machine needs to be taken apart, the front dispenser comes off easily - a T10(?) screw inside the 'aroma' knob.
https://www.youtube.com/watch?v=CKwxxUgQu7g
DeleteThis comment has been removed by the author.
DeleteMy Saeco Talea Giro Plus has had a sensor error of some sort for a very long time. It otherwise operates normally until it decides it has an error. I will get the ! error flashing, and what seems to fix it is: open side door and remove puck/water disposal. turn off machine, turn on machine, reinsert disposal tray and shut top door. I think there is a problem with some sort of sensor on the side. I never seem to get the puck full error, just the ! and no operation until I clear it. Any ideas?
ReplyDeletechecked on another machine and the error light goes on as soon as a door opens and off as soon as its closed. On mine, there seems to be no door open error when you open it up. Must be a door sensor?
DeleteI've had similar behavior before doing the teardown. With regular cleaning (every 3-5 days) the occurrence has reduced a lot.
DeleteRemove the waste assembly and the rotary assembly and clean everything thoroughly with a damp cloth. Let it try completely. While it's drying, clean the removed parts very well by hand - the dishwasher doesn't do a great job.
The contacts are magnetic so they should last a really long time.
If it's a flashing error the door is not closed or the waste basket is not sitting properly. Try to open/close the door a few times to see if it fixes it. Then try to remove/reinsert the tray without opening the door to see if that's the problem.
If the error led is lit up continuously then the water sensor is triggered. It's a capacitive non-contact sensor and it might mean that the machine is dirty or damp inside the waste space.
The door has a magnet in the middle-upper position, check with some ferrous device (screwdriver).
DeleteTake a strong neodymium magnet and wiggle it under the sensor inside the machine, the one that matches with the door magnet.
It's a Hall sensor, though I'm not sure if it's the mechanical type or the electrical type. If it's the mechanical type, the magnet action might be able to force it to move if it has become stuck. Mine doesn't make any sound when a magnet is near (unlike a bicycle speed sensor)
Do this with the machine turned on and see if the status led changes. If not, I suspect either the sensor is damaged or its wiring is.
Hi
ReplyDeleteFantastic blog you have very inspiring!
I wonder if you could help me to ? I have a lot of grey hair I have been struggling with me Saeco talea ring plus for to days now ! Problem is it continues to make an priming water circuit for hours ! I have teared apart clean it and descal it ! I had luck to times to make a good coffee ! But after I have descale it it won't work only priming for hours !! I think maybe it is the flow meter or the blow down ? What do you think ? Thanks if your reading this and replay
With best regards Martin
It was The flowmeter that was The problem !
DeleteHi Martin
DeleteI have a same problem with my machine. Could you ,please tell me how you fix it?
thanks
Hi,
ReplyDeleteI currently have a problem with my Telea Giro Plus and was wondering if you could help. Water is leaking from the bottom of the unit and will not run through the system to make a coffee. No error lights on but when I try to make a coffee it grinds with no problem and the grinded coffee ends up dry with water coming all through the bottom of the machine. Also tried a descale but very little water came out of the steam wand, most of the water came out from bottom of machine and also in the water container of the brew group. Please let me know what it could be and where I should start
I had similar problem with my machine. It turned out, that a valve connector was broken (cracked): https://philips.encompass.com/item/9702634/Saeco/996530009862/Saeco_-_Valve_Connector (the new one seems to be reinforced)
DeleteHi Martin,
ReplyDeleteGreat article. I have Gaggia Platinum Swing Up machine same as Saeco Talea Ring. It developed an issue when it has coffee in the hopper but after grinding it, the powder goes into dreg box. If I push beans with my fingers into the grinder, the maker will brew couple of cups but, after will display a message Fill container with coffee even though there is plenty in the hopper.
I took apart the machine and cleaned the grinder, also did discaling and lubricated brew group just to make sure I cover all the points. Still, it does the same round of dumping powder into the garbage. I think it is Hall Effect sensor located on grinder. Do you have any idea what else could it be?
Thanks,
Gene
Hi Gene
DeleteI have a Saeco Talea Ring plus and have the same issue. Not sure hot to fix it and don't want to spend $500 or more to ship it away and get it fixed.
As mentioned by 'Coffee drinker' above, there is a nice youtube channel with a lot of information: https://www.youtube.com/channel/UCAoPVatiWo-RRkXkApZXeAA
ReplyDeleteor search for 'Miroslav Stoicev'.
He also sells some parts on ebay and they are not terribly overpriced.
A device that is basically used to measure the flow of air through a pipe or tube is known as the air flow meter. These are usually used in cars to measure the amount of air that enters the engine at a particular time. It helps to regulate cars and ensures its smooth functioning. These are available in a range of settings and features to suit different purposes.
ReplyDeleteFlowmeter Installation
Thanks for this post and the responses the comments. Both are extremely helpful.
ReplyDeleteMy Saeco Odea Giro Plus has had an ongoing problem that "fixes" itself after a while either by not using it for several days or by adjusting the water knob at the top while coffee is brewing.
Here's the problem: coffee does not come out of the front dispenser. Even at start-up, water does not come out of the dispenser. Recently (i.e. today), the grounds have dry, so I suspect that water is not getting into the brew group correctly.
The odd thing is that this problem tends to happen after descaling the machine. Yesterday, I descaled the machine, made several coffees, and then turned the machine off for the night. When I turned it on this morning, the machine made half an espresso before the coffee stopped coming from the dispenser.
As I noted, I've been able to "fix" this problem by adjusting the steam/water wand while the pump pumps water to the brew group. Doing so makes the pump briefly sound like it's doing its job, but then it get quieter.
Other than this recurring issue, I love this machine and want to keep it. Any ideas on how to fix this problem correctly?
I would suggest you make a small movie clip with the symptoms, others might help you out. The machine I got had a similar behavior in the beginning, turned out the [plastic] 'faucet' at the top of the machine was cracked and water was going anywhere but in the cup. I 'fixed' mine by plugging the unused cappuccino hose with a drywall screw and Loctite. It has been like that for more than 3 years.
DeleteA replacement faucet (see part 11004625 and everything inside) is around 50USD, but I cannot be sure that is the problem.
Very interesting post, exactly what I was looking for. Just seeing post and discussion I have got full information regarding coffee machine.
ReplyDeleteRapid Industrial Supply
IS THERE ANYONE OUT THERE THAT CAN HELP A RETIRED ARMY GUY WITH A QUESTION ABOUT A MIELE CVA 615 WITH A BREW UNIT ERROR THANX
ReplyDeleteHi there,
ReplyDeleteCould you tell what are those blue components on the third picture (top right) next to where the yellow wire is connected?
I can't tell if they capacitors or varistors.They almost look alike.
The reason I am asking is that, my machine was shorted after some outside house work. Pulled some underground wires and pretty much all electronics in the house were damaged.
I inspected my Saeco Intanco deluxe, and found that the 115v 9v 3.2va transformer is damaged and two yellow things in front were burned. Mine are yellow yours are blue. Couldn't tell what they were since they badly damaged, but similar once on the board are 7n241k. I was told they were varistors.
Tried to put a dual input output 115v 9v 2.3va transformer and it blow the second I turned the power on. Anything else that I might have a check (components) for damage?
Thank you
They look like MOVs and are marked RV2(and RV1?) on the board. So I would guess varistors is the right choice.
DeleteThe yellow chips in my picture look like small isolation transformers, but I could be wrong. They are marked ISO6-ISO8. The smaller black ones look like optocouplers, ISO1-ISO4, ISO9.
My guess is that everything between the fuse and up to (including) the optocouplers/transformers needs to be replaced, it probably received 220V. I think it's better if you can source a working power board from a broken unit.
Thank you,
ReplyDeleteI replaced the transformer and the two burned varistors. Now the machine turns on, heats up, but I don't hear water pump.
No hot water, no steam and no coffee. All it says is ventilate. I did prime it good, but no luck.
I am thinking to change the Triacs (Thyristors) next to the burned varistors. The writing on them is all gone.
How do I test the water pump? I am thinking to just hot wire it, but I am afraid it will destroy it.
Is it possible just to test it with Multi-meter?
Thank you
If you've gotten this far then it might be recoverable. My pump is rated for 48W@220V (see marking) so I assume for your machine is also at line voltage. Since it's not primed I would suggest you don't power it up for more than a few seconds otherwise it will overheat.
DeleteFor triacs a good rule of thumb is to use 2-4x rated power, so for my pump it would be 48W/220V*4=0.87A. Motors (pump) will have higher inrush currents while resistive loads (heater) will have lower.
I would guess the control parts are triacs and not thyristors.
Hi Ligius,
DeleteIt turned out that the Klixon at the pump was bad. I bypassed it and everything works fine now :)
One more thing. The Grinder unit, I see there is a mark on the big adjustment wheel(yours marked in red). How do align that with the small adjuster?
What I did was, I put the big wheel in then turned the small adjuster until the mark on big wheel aligned with the mark on small adjuster.
But then when I put the top cover on I don't know if I have to set the adjuster(where you dump coffee beans) clockwise or counter-clockwise.
What do you say?
Thank you
Don't remember right now, it should be set in a way that it allows full adjustment in either direction, I think I marked the gears with a marker before taking them off.
DeleteAfter 3.5 yrs my Talea Giro Pro has become unusable due to something during Descaling (which I have been doing religiously).
ReplyDeleteHere is where I am at.
1. I started the normal descaling process.
2. the intermittent feed of water cycled through until the water tank became empty.
3. Here is where the issue comes in. I wasn't standing there when the tank became empty and it didn't just stop trying to pump, instead the pump was continuing. So i refilled the tank thinking the pump would just start moving water for its normal cycling during the descaling process. It did not move water anymore. Its like the pump is not primed and can not prime itself. Since I'm in the descaling mode I can't determine how to get the water to prime and continue through to finish. Now it is just stuck no matter what I do.
Any Thoughts?
Just force the descaling process with the full tank, the pump will eventually prime itself after a few tries. On my unit I do this: press the 'teardrop' button, rotate the knob (faucet) above the unit to the hot water position until it fails, reset it, rotate it back, until it eventually primes.
DeleteThis comment has been removed by the author.
ReplyDeleteMy unit is fully functional but producing very translucent coffee (able to see bottom of cup). The unit is +/- 5 years old. What do you think could be the problem? What parts would you advice to replace anyway?
ReplyDeleteI would first clean the brewing unit thoroughly, the black assembly which you can remove from the machine. You should see coffee stuck to the 'slide' and to other various parts, preventing fresh coffee from going inside the 'cup'.
DeleteIf that does not fix it, perhaps the faucet is leaking, but you should see that as water coming out from some other places.
Other than that, you could try setting the coffee grind to a coarser one or clean the coffee outlets in the front with the special brush/stick thing, that goes inside the tubes.
You know your projects stand out of the herd. There is something special about them. It seems to me all of them are really brilliant!
ReplyDeleteclick here
I have checked this link this is really important for the people to get benefit from.
ReplyDeleteCoffee
Hello, My Odea Giro is exactly 5 years old and has been working great without issue until a few days ago. It seems to be functioning fine but has started producing really weak coffee. No leaking, I've tried different beans, cleaned the brewing unit several times, and no change. Any suggestions as to what it might be?
ReplyDeleteHello, My Odea Giro is exactly 5 years old and has been working great without issue until a few days ago. It seems to be functioning fine but has started producing really weak coffee. No leaking, I've tried different beans, cleaned the brewing unit several times, and no change. Any suggestions as to what it might be?
ReplyDeleteI would suggest running at least one descaling cycle to make sure that is not an issue. Normally as long as water makes it through the cup it should go through the coffee grind.
DeleteI don't have any ideas yet but if you like tinkering you could open the side door and affix a small magnet at the door detection sensor just above (middle) of the brewing unit. This would allow you to run the machine with the door opened and see if water somehow makes its way around the coffee. To see where the magnet should go use a metallic piece to find the matching magnet on the door (top middle).
Apart from that you can check the funnel for the coffee to see that it's not clogged, but I assume ground coffee is already getting to the brewing unit. Check the coarseness and adjust if too coarse, but normally the grinding wheel does not wear out so easily. On my unit, to adjust the coarseness I have to push down on the small black spindle inside the beans container and rotate it.
Hello, my Talea Giro plus is now about 8 years old. I had recently replaced the grinder motor and the sensor below the motor. (By the way, https://www.encompassparts.com has great prices). But now, the grinder seems to grind longer in time and a lot of times the just ground coffee is directly disposed into the trash bin and the red exclamation mark goes on. By lifting and closing the bean lid, the error is gone and the next time the Machine woks fine - sometimes. Currently wasting lots of fresh coffee. Any advise other than to buy a new Saeco will help.
ReplyDeleteThanks
Check to see if the bean lid sensor is not obscured by coffee remains. You can force the sensor on with a powerful neodymium magnet, see if that causes the issue.
DeleteThe other suggestion would be to check the grinding motor sensor wiring, maybe it's pinched. If the sensor is faulty the machine will think it has not ground any coffee.
Hi Friend, I have the Odea Go, and my problem is similar , it's 8 years olds but everything is working fine, but suddenly afters many coffe it start to take 9 seconds to grind the beans, I want to know if it's possible to set the grinder time o may be a hardware issue, the sensor is working because if there are no beans the machine present the red Led (admiration), thanks if you can help me, i know electronics board and can make any change if you order me!! Thanks
DeleteI have a 5 year old ODea Giro and it keeps clicking off randomly and then I have to turn it off and on a couple of times to get power. Then sometimes it works fine. What is wrong with it and how can I get parts and fix it? Thanks!
ReplyDeleteI have a 5 year old ODea Giro and it keeps clicking off randomly and then I have to turn it off and on a couple of times to get power. Then sometimes it works fine. What is wrong with it and how can I get parts and fix it? Thanks!
ReplyDeleteIt's probably the X2 capacitor, if there is one on the board. It should look like a colorful cuboid. If that is not the case, then I would first suspect electrolytic capacitors. All of these parts are on the power board, the one with the heatsink, not with the microcontroller.
DeleteHi sorry for my english.i have à problem i have a sensor That i don't Know where it goes. He is with à plug Who goes at the grinder but where go the sensor ? Thanks for your help
ReplyDeleteHi, I need more info, a picture or something, cannot figure out what the question is.
DeleteThe sensor sits just below the grinding wheel, as far as I remember.
DeleteHi Ligius
ReplyDeleteI have an approximately 5 year old Gaggia Platinum Vogue which looks almost identical to the unit in your post and has some Saeco parts inside.
The machine would only make one cup after start-up and then would just grind a bit and dump coffee grounds into the hopper without any more cups made. Clean the brew group and grease and restart and still same problem - 1 cup only and coffee then getting dumped in hopper without brewing.
Descaled machine as well still same problem.
Thereafter I removed and cleaned the grinder using instructions from "whole latte love". Machine primes and can dispense water and steam but now doesn't grind at all - is it likely to be the grinder motor or a sensor and how can I check?
Many thanks,
Josh
Hi Josh,
DeleteIs any error displayed on the machine? I would check that first, perhaps the sensor for the hopper cover got disconnected.
If the machine does not even begin grinding then I assume it's either the motor at fault or (more likely) the plug going to the motor. I don't know exactly what cleaning procedures you've followed so not sure what could've been affected.
The machine detects a grinding error by [I think] detecting the speed of the motor connected to the grinding wheel. So the motor has to spin first for the unit to detect an error. At least that's my assumption.
See also http://hackcorrelation.blogspot.de/2017/02/automated-coffee-machine.html for troubleshooting.
ReplyDeleteThanks Ligius
DeleteMy assumption was also that I'd inadvertently disconnected something or blown a fuse somewhere. The two ceramic fuses on the board seem fine.
The motor has a print on it which appears to say 230V so I disconnected the wires to the motor and connected them to a multimeter on ACV. With sensors all normal and machine in code checking mode, the voltage initially reads ~20V. When I push the grinder mode it jumps initially to around 165V and then falls back to 90V. I'm assuming therefore that it is being sent a grind signal as it should.
Should I then guess the motor is at fault? Any easy way to check the motor without sticking 220V on it?
Thanks,
Josh
Hello everyone.
ReplyDeleteThanks for the post, I found a lot of useful information here.
I need a little help, I have a Coffee machine Delonghi ESAM 3500 N, I have a problem with the amount of ground grain, I always choose the option of "extra strong tast" but it is only grinding a small amount of grain, grinding time is just about 3sec, some times less and some time more, the coffee leaves very weak,
Occasionally she makes a correct coffee, grinding more grain and getting a coffee with the strong flavor but is very rare.
This problem of error in the amount of grain ground, can only be on the board, or could be some sensor or relay...?
Thanks for your help!
Giglio,
From Brazil
Hi Giglio,
DeleteI can't help you with that as it looks like a completely different machine. However, the problem could be caused by: bad coffee (not for automatic), incorrect grinding adjustment, broken grinding wheel, bad grinding sensors (speed? weight? not sure which you have) or bad motherboard/connections.
Sorry I can't help more.
Probably a broken power board right now trying to find out , this problem appears on many delonghi coffee machines. on one replaced interface board problem didn't go away waiting for power board to arrive.
DeleteHi Ligius, I have a three year old Seaco Minuto, which doesn't want to leave the rinsing process after decalc process. I have tried several times with lots of water to complete the process, but it looks like it is always stuck at appr. 95%. I tried all functions in test mode and everything works fine. It heats, it grinds, the water comes out normally, etc. I can completely disassemble and assemble the machine, but it doesn't return to normal working mode anymore. Do you have a hint, or even better the right solution for me? Thank you very much! Regards, Mark from The Netherlands
ReplyDeleteHi Mark,
DeleteThat's a somewhat different machine. I know on some machines (like Talea, but others as well) you have to keep a button pressed for a few seconds.
Other than that, I would play with the steam selector 'wand' and check all the sensors by re-seating stuff.
As a last resort, you could unplug the machine in the middle of some cycles so it forces an end-to-end travel on startup.
That's all I can say for now.
Hi Ligius. The amount of grained coffee could be set thru Infrared beam but I'm wandering if could be another way. Thank you.
ReplyDeletehello everyone i have a little issue with saeco touch plus it look like water pump not get enough of power
ReplyDeletei will please if someone can tell me what is problem i checked power supply on pump and show only 20 V same at motherboard 20 V and should be 220 V
ReplyDeleteHello all, first thnk you for this great guide!!!
ReplyDeleteSorry for my bad english. I have exactly this problem describe it here. Some weeks ago can fix it with the solution in the video, but now, doing that the problem continues
https://youtu.be/ZT6rt1VZj-c?t=36s
in the 01.22sec the green light flash and start heating.... but now that don t happens in my machine.
Anyone with this problem?
Thnks in advance
Jorge
If it makes a loud noise while it tries to prime or make coffee, it might need descaling. When the pipes get clogged up with scale the machine has a hard time pushing water through, triggering the alarm.
DeleteYou need to let the priming run for a few seconds, in the video it took a really short amount of time. For my machine it takes around 5-10 seconds.
If no water is coming out when priming, then the issue might be with the water tank valve or the water pump or some sensor.
Thank you very much for your prompt response.
DeleteIt happens to me just like in the video, once ignition, the red warning light continues blinking.
When I turn in a clockwise direction, very hot water comes out from the steam wand, but never turns on the green one.
Hello, is there a video to explain how to replace the power boards? Thanks.
ReplyDeleteI don't know, but assuming you can take the unit apart (see my steps above) it should be easy to swap out the board, just a few screws.
DeleteThis comment has been removed by the author.
ReplyDeleteHi,
ReplyDeleteI have an issue with a Talea ring plus. When making a coffee, water comes out of the steam wand first and the coffee is very transluscent.
Coffee is somehow better with pre-ground and no water comes out of the steam wand.
Any idea ?
I would bet that the frothing valve (the one controlled by the knob above) has bad o-rings. Should be easily replaced, like I've written above, or you can completely block the wand (as I did).
DeleteThat's my first idea, but could be other issues as well. Very typical of these machines.
Amazing work. This is the most detailed post I found and is very helpful. I have a question...
ReplyDeleteI own Saeco Odea Giro. Having problems with the brew group motor.
After taking apart and using the test mode, I believe that the motor is faulty. It works but it's like it doesn't have enough power to move the parts as it should. Does that make sense?
When I let the motor run with no load, it works, but when it is properly connected through the gears to the brew group, it gets stuck mid way.
Should I replace the motor?
Which is the right one? And where would you buy?
Or any other idea?
Replied on the other blog.
DeleteHi. I have Talea ring.The coffee tray is full with beens but somethimes machine shows- feel up coffee bens.What could happen?
ReplyDeleteThere is a magnet under the bean hopper. Either the cover sits too loose (dirt on the edges, deformed gasket) or the sensor sits too far away from the magnet.
DeleteYou can identify where the magnet is and add a smaller magnet to it, this will make it stronger.
This is coffee machine is simple but reliable as hell! It outlived all the other newer coofee machines our boss kept buying in this quest for a perfect cofee machine. This one has done so many cups that the brushes on grinder motor got worn out, but it still keeps going strong! One of the small flaws was the high pressure side that started leaking right onto the water reservoir level sensor making it unable to detect level. There are relatively small issues compared to the other junk coffee makers that went through the office abuse, this one is robust simple and most importantly - makes good coffee! Get one if you have a chance even used one is better than any of the other cheap junk you can buy nowadays.
ReplyDeleteTalea Ring Plus. I'm very near to blow my coffe machine with some explosive :)
ReplyDeleteWhen turning on machine, the startup process fail and no clean water come from brew unit/coffee exit.. with an error (like no water in the boiler)
So.. Turning knob on hot water dispensing, to load water circuit, and the water came out normally.
Trying to make a coffee.. grinder works, brew unit move normally and compress the coffee, pump works, water go in pressure (the water knob push up a little due to the pressure) but no coffee.. and then the system stop to try to do my beloved coffee without a single drop of water in the wasting tray.
Brew unit is clean.
I removed the brew unit, placed magnets on sensors, started a coffee using manual poweder and verified that no single drop of water arrive to the brew group.
It's the time to replace the electrovalve on the back of the brew unit (or the little valve behind the brew)?
Or something else?
(sorry, my english is terrible, I know :) )
By process of elimination, I would guess the water flow meter might be broken. The electrovalve should work if you can still get steam out.
DeleteA fast blinking red light means internal error (I think), it did this for me when the lines were clogged. But in that case even steam would not come out.
Maybe this will help someone else , im an elctro technician by trade but this machine the Talea Ring had me perplexed , continual priming , intermittant , replaced all orings throughout machine , absolutely minimal pressure regulation only in the last valve , took the flow sensor out , decided to open it up , lifted the black cover on the 3 legs to expose the sensor , its covered in silicone glue , cut it all away and to my surprise the water had collected under it and eaten on of the 3 sensor legs off , cleaned it up ( carburettor cleaner ) and soldered a wire between the leg and the pin and voila ,, working again .
ReplyDeleteAmazing post, really liked it. I've bought a Talea Giro second hand and it's pretty nice. At work we have a Saeco Lirika. The group (the part you can take apart for cleaning etc) from both machines looks exactly the same. I've a couple of questions, some generic about automatic machines and others specific to Talea... The first is: why Saeco machines brew espressos in around 10 seconds when it should be at least 20 seconds of having water running through the ground coffee? Doesn't it affect (negatively) the taste of the brew? Then 2: what's the difference between the "coffee dose" button, the one with the three beans? I know the machine grinds more coffee with 3 beans selected but how many grams for each "bean"? I'm assuming it goes from 7 to 10gr?
ReplyDeleteI hope you can enlighten me... Thanks a lot !
About the brewing time, I've read your answer to a similar question, saying that these machines are not replacements for more expensive ones, but I wonder why having a shorter brewing time affects costs of the machines... It's related to the type of pump and stuff required to brew "properly" between 20 and 30 seconds?
DeleteI guess the 10 seconds is just meant for office - nobody wants to wait for their colleague to finish brewing their coffee :)
DeleteYou can perhaps adjust the time by adjusting the grinder to a finer grit. I think it just measures how much water has passed through, not how much time. Coffee brew time is anyway a question of personal taste.
"Beans": Yes, it goes from 7g to 10g, per manual. Perhaps intermediate is 8.5g?
Extensive write up with great info nice work. I have torn a few of these Saeco Model apart. The Talea touch I blood for cheap is really giving me issues now. Touch screen just start brewing on its own. Once you select an icon that goes into a different screen or back to the home brewing screen don't know if it's a motherboard or touch screen but all parts for are expensive and these things are not dependable
ReplyDeleteHi Ligius,
ReplyDeleteThanks for the amazing work!
I fixed my Saeco Odea several times but I'm stucked now.
No water coming to brewing unit or steam.
Thought it was the pump, changed it, same results.
It's like the pump was forcing too much like if the water path was obstructed somewhere.
Also in test mode I can't here the click when pressing the main button at 10 o'clock. Heard something about "solenoid valve" but don't really know what part it is.
Do you have any idea what it could be?
Anyway thanks again for all this!!
Hi, this article is on the old blog, I will need to remove it and copy all the comments onto the new post. There are a lot more comments and answers there.
DeleteIf you have time, I would disconnect the output hose from the boiler to everything else (the steam valve) and try to CAREFULLY see if I can get anything out of it. Or disconnect the boiler input and see if the cold water is being pumped to the boiler.
It could be that the boiler is plugged, I doubt there's anything else up to the steam valve that can get scale. My bets however would still be on the valve since it has such a small diameter.
Saeco odea go , grinder always run without stop . When u switch power on u can see that the grinder run immediately and non stop . Any idea please ?
DeleteThanks for your post. I have a Saeco Talea Touch plus. When I replace the drip tray, then shut the door the machine turns off. If I shut the door, then replace the drip tray same thing happens. Any ideas why?
ReplyDeleteDid you check the cord socket on the back? On mine, the cord becomes loose with time and has to periodically be plugged in.
DeleteThanks so much for your reply. Yes I have checked this. If I pull the dripvtray out a little the machine starts up to give message replace drip tray, I push the tray back in, it turns off, if I open the door, it starts up again until message appears close door,when I do this machine shuts down again. If the brew group is removed machine will stay on with both drip tray and door secured!
ReplyDeleteHas anyone else had this problem? Any other suggestions?
ReplyDeleteHi. Lots of great info. Thank you. I have a Saeco Talea Ring and we love it, but recently we have a lot of water leaking from under the machine as well as water leaking from the steam wand.this happens only when brewing coffee, not when using the steam wand. Any ideas would be greatly appreciated. Thankyou
ReplyDeleteHi. Lots of great info. Thank you. I have a Saeco Talea Ring and we love it, but recently we have a lot of water leaking from under the machine as well as water leaking from the steam wand.this happens only when brewing coffee, not when using the steam wand. Any ideas would be greatly appreciated. Thankyou
ReplyDeleteHi. Lots of great info. Thank you. I have a Saeco Talea Ring and we love it, but recently we have a lot of water leaking from under the machine as well as water leaking from the steam wand.this happens only when brewing coffee, not when using the steam wand. Any ideas would be greatly appreciated. Thankyou
ReplyDeleteIt's either the "tea faucet" that's leaking (cracked) or the rubber tubes are cracked.
DeleteIn my case it's both, I had to get a new machine since the plastic faucet costs >50$ and not sure if it fixes the problem. It had a crack that was not visible when idle, but expanded when pressure was applied to brew a coffee.
V2 has a metal body but I have the V1 which is plastic.
To diagnose it: take the top cover off, install the beans hopper temporarily, with the cover in place. The left side panel can also be removed and replace the water reservoir. This way the machine can be run without cover and you can see what's happening. Be careful, as the wires are live.
I meant: take the big front and top cover off, install the beans hopper with its cover in place but without the big top (machine) cover.
DeleteSafeco xsmall, it grinds and then dumps it without brewing. Initially the green light is steady on and than after a few seconds of grinding the red alert light turns steady on. Any idea what can cause this?
ReplyDeleteIt's likely that the machine detects there are no coffee grounds (or the grinder is not turning) because the hall sensors on the grinder are not working properly. Just my guess.
DeleteThe boiler pipe can be unclog manually???I have saeco talea ,i remove the boiler and when I connect water pump to the boiler inlet pipe no water coming out on outlet pipe of the boiler.I am sure that water pump is working.
ReplyDeleteI know a lot of time has passed but this post is great.
ReplyDeleteI have to ask since I have the Saeco Odea which seems almost the same as this one, and I wanted to know if it is possible to bypass the magnetic sensors (I am guessing just cutting them and putting the wires toghether) and if it possible to bypass the residual water sensor (this one I do not know how to do it). This is to avoid pesky alarms which are a pain in the head in this machine.
Yeah, this blog post was duplicated to a new address (without the double L typo in the title) and there are a lot more comments there. I think the wires can indeed be twisted together to make it believe the lids are always closed. For the waste water sensor, probably unsticking it and moving it further away would solve it. The new machines (Philips-branded) do not have the magnetic sensors anymore and I think the waste water light is just counting the cycles instead.
Delete